Quantum Bodypack | Recording & Triggered Recording
Note: This article applies to both Prime 3 Haptic XR Gloves and Prime 3 Mocap Gloves
Note: This article applies to both Quantum Mocap Metagloves and Quantum XR Metagloves.
MANUS Core
MANUS Core enables the use of the MANUS Quantum Bodypack.
MANUS Core
MANUS Core is the background application that processes all data and clients can connect to.
MANUS Core starts automatically when the Bodypack is turned on and should be running at all times.
MANUS Core Headless Recorder
MANUS Core Headless Recorder is a console application that facilities the recording functionality of the MANUS Core Dashboard, but without running a graphical user interface.
Headless Recorder on the Bodypack enables:
- Triggered recording with Wi-Fi
- Manual local recording with Wi-Fi
MANUS Core Headless Recorder starts automatically when the Bodypack is turned on.
MANUS Core Dashboard
MANUS Core Dashboard is the user interface to configure MANUS Core, configure connected hardware and use the recording functionality.
Dashboard on the Bodypack enables:
- Triggered recording with Wi-Fi
- Manual local recording without Wi-Fi
Dashboard does not start automatically when the Bodypack is turned on.
We recommend using the Headless Recorder on the Bodypack to minimize performance and power usage.
Dashboard can be used on another computer, while running Headless Recorder on the Bodypack for manual local recording with Wi-Fi.
File Saving & Take Duration
To reduce downtime when saving, we recommend recording 15-20 minutes takes.
Triggered Recording with Wi-Fi
MANUS Core on the MANUS Quantum Bodypack can received start/stop recording triggers over UDP, allowing you to synchronize your recording pipeline.
Only when starting and stopping recording the Bodypack needs access to Wi-Fi.
To use remote triggering, follow these instructions:
Vicon Blade
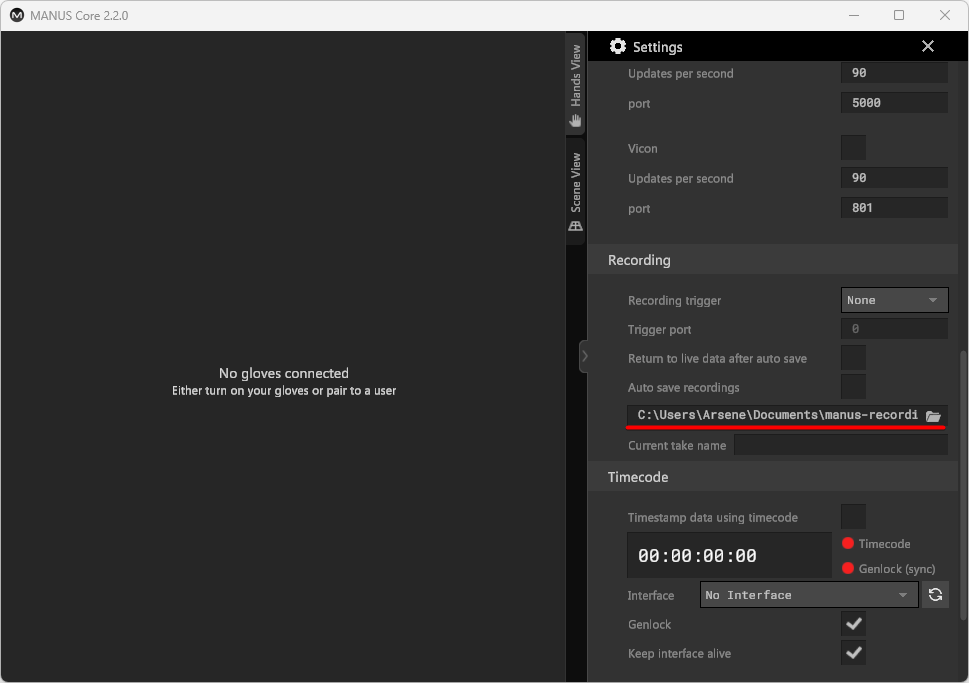
Open the MANUS Core Dashboard "Settings" tab:
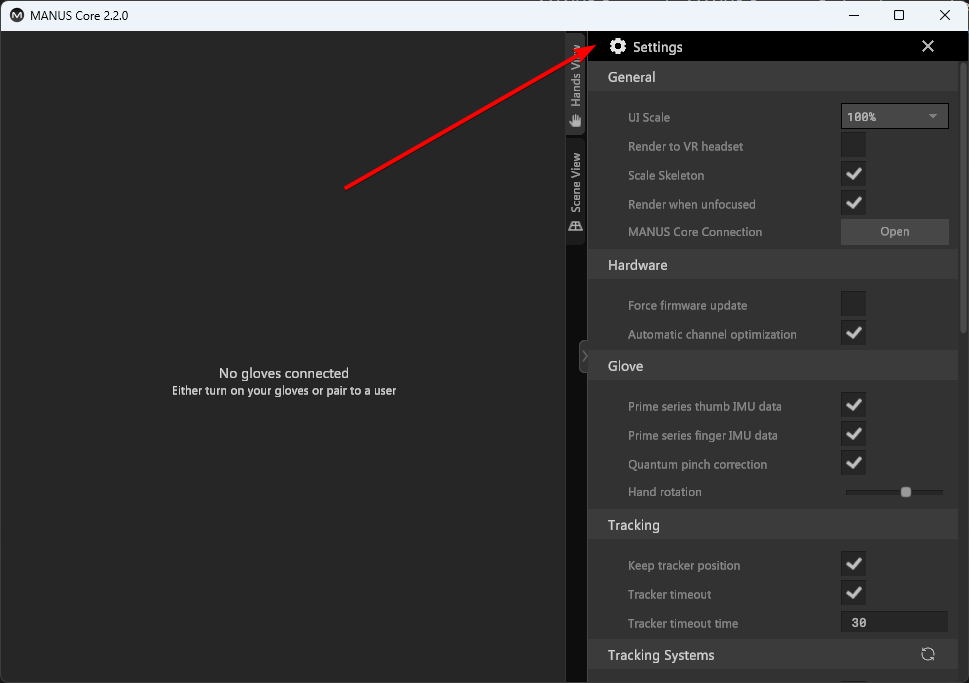
Scroll down to the "Recording" section:
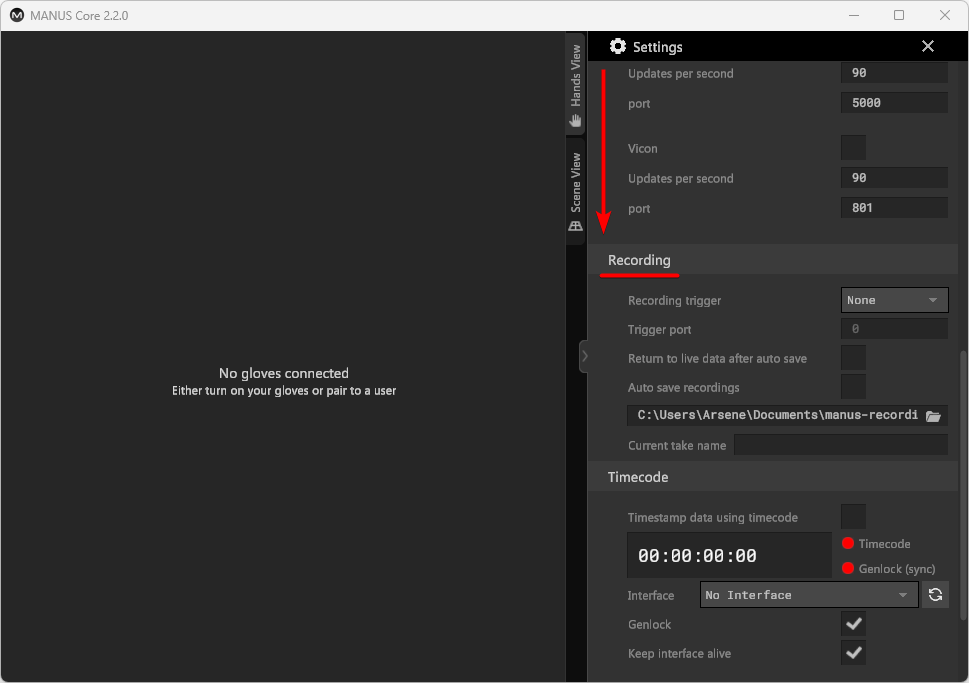
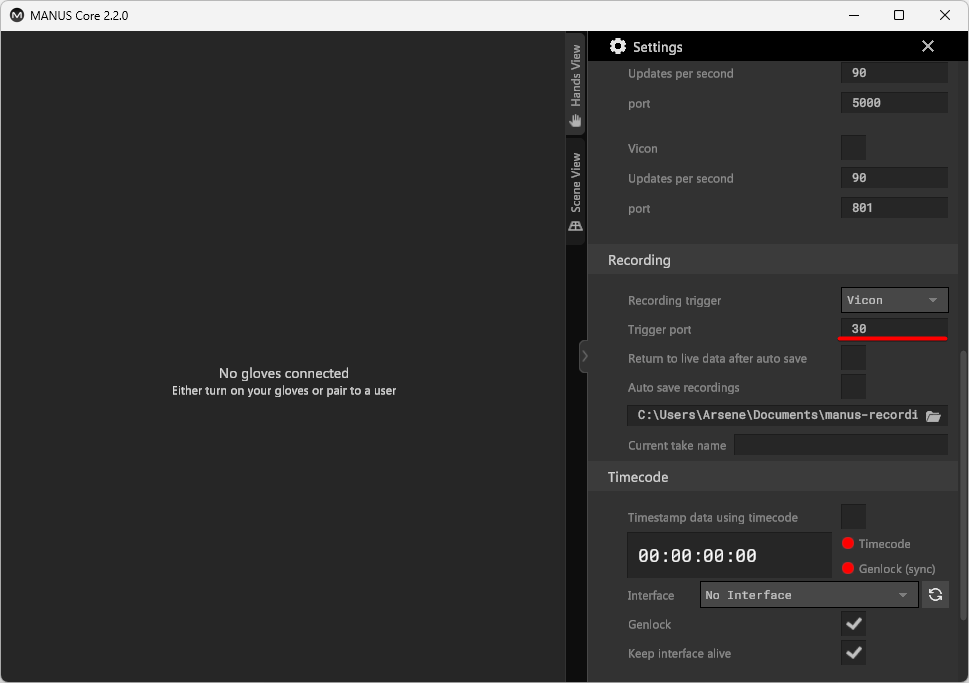
Select "Vicon" as recording trigger:
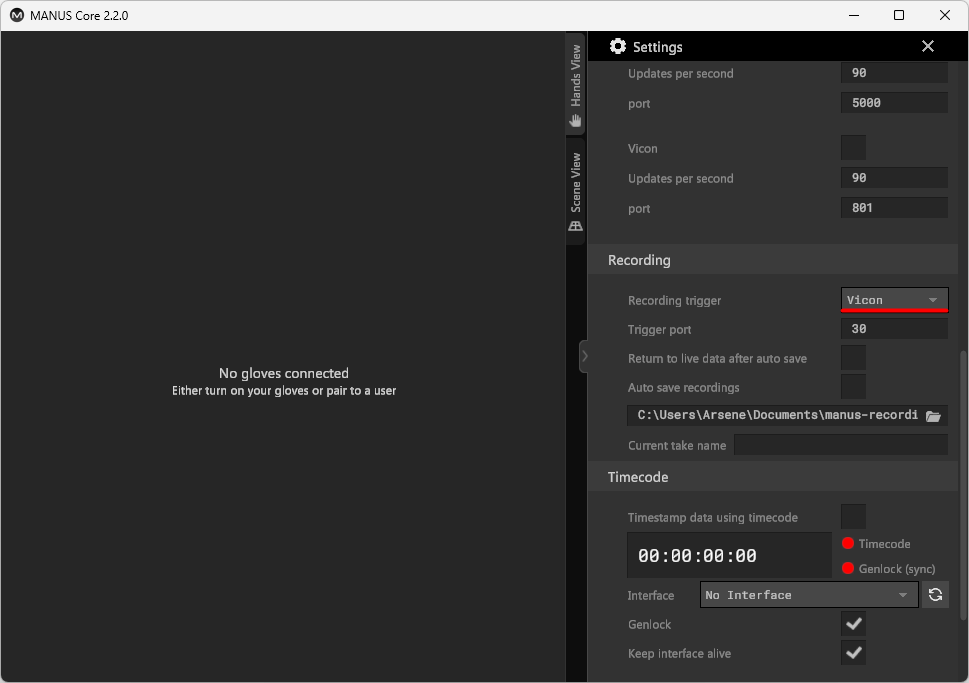
Set the trigger port (the default port is 30):
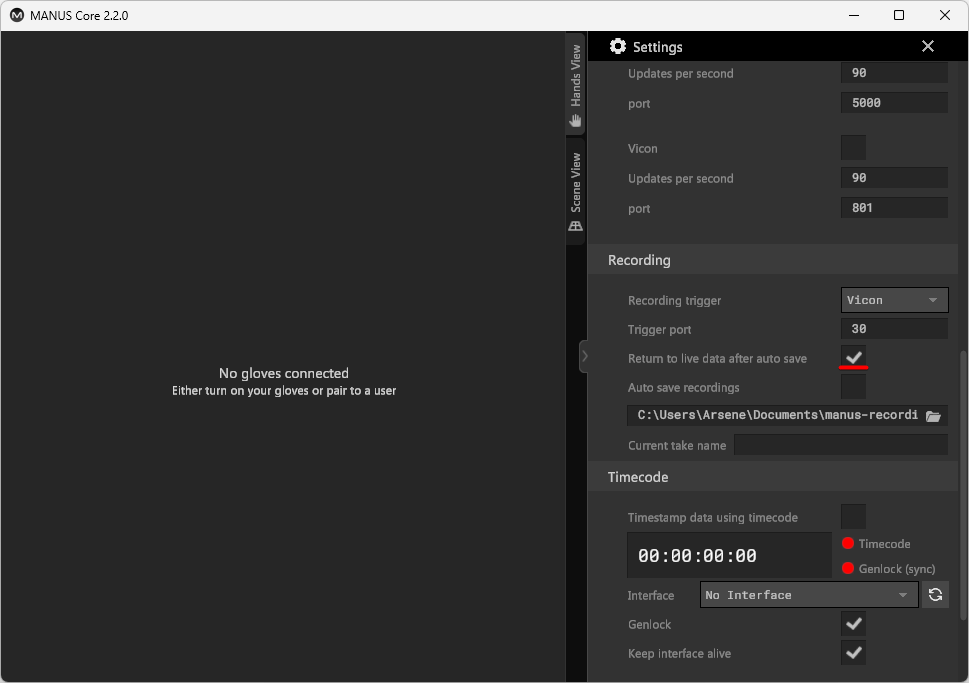
Enable "Return to live data after auto save" to unload the recording after saving:
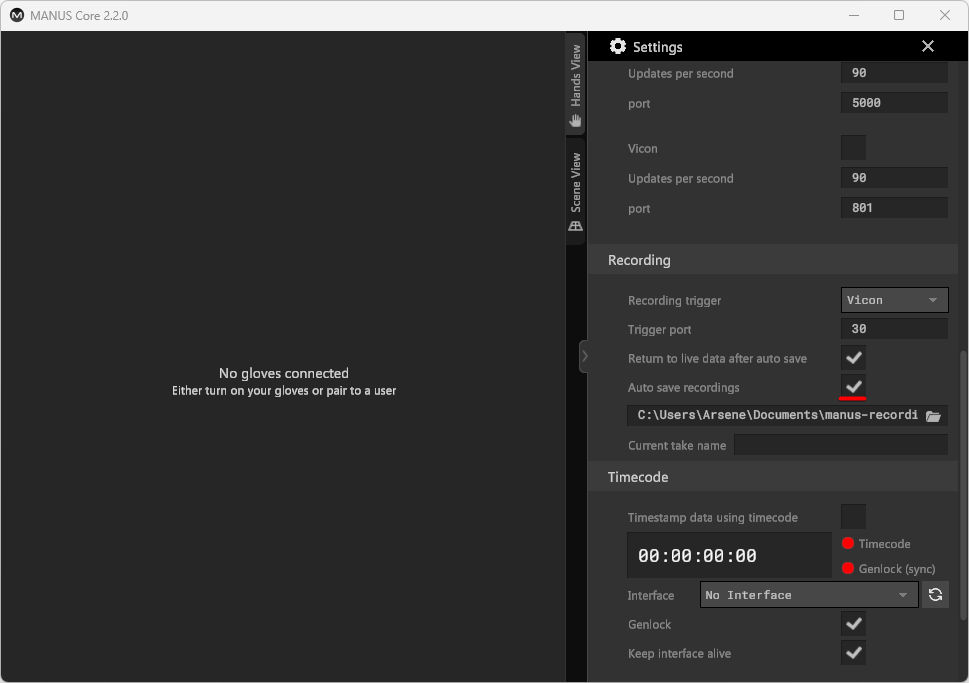
Enable "Auto save recordings" to automatically save your recordings:
The 'take name' will be provided by the UDP trigger message:

The absolute file path from Blade will be provided by the UDP trigger message:
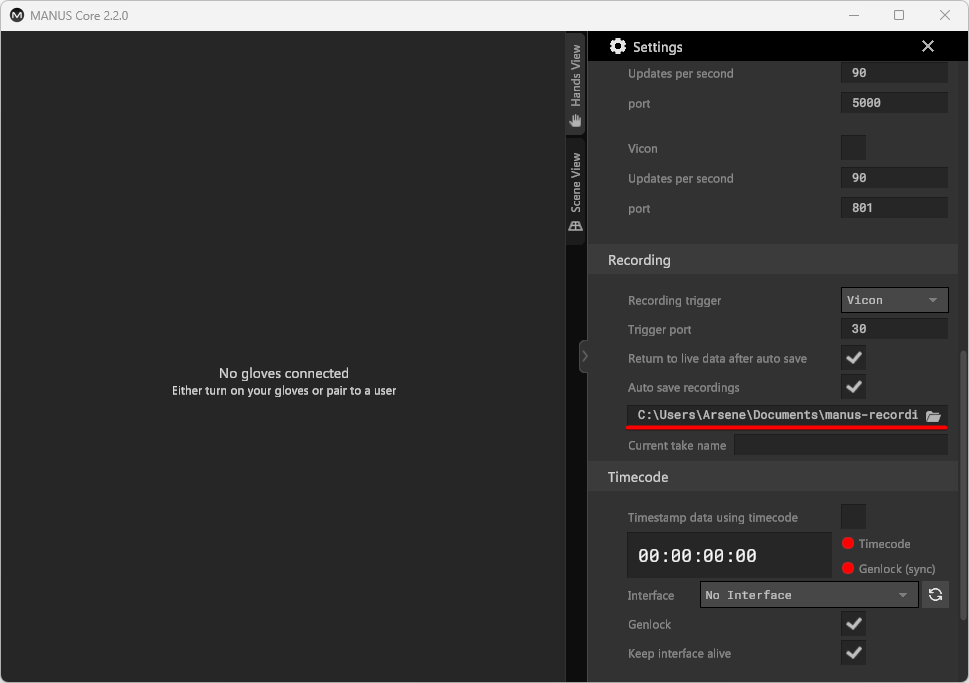
If the absolute file path on the computer running Blade is not accessible by the Bodypack, the file will be saved locally on the Bodypack using the default file save directory.
Consider using a network accessible folder to save all your recordings in one place.
MANUS Core can be configured to receive Timecode & Sync triggers, allowing you to timestamp and synchronize your data recording.
Vicon Shogun
Open the MANUS Core Dashboard "Settings" tab:
Scroll down to the "Recording" section:
Select "Vicon" as recording trigger:
Set the trigger port (the default port is 30):
Enable "Return to live data after auto save" to unload the recording after saving:
Enable "Auto save recordings" to automatically save your recordings:
The 'take name' will be provided by the UDP trigger message:
The absolute file path from Shogun will be provided by the UDP trigger message:
If the absolute file path on the computer running Shogun is not accessible by the Bodypack, the file will be saved locally on the Bodypack using the default file save directory.
Consider using a network accessible folder to save all your recordings in one place.
MANUS Core can be configured to receive Timecode & Sync triggers, allowing you to timestamp and synchronize your data recording.
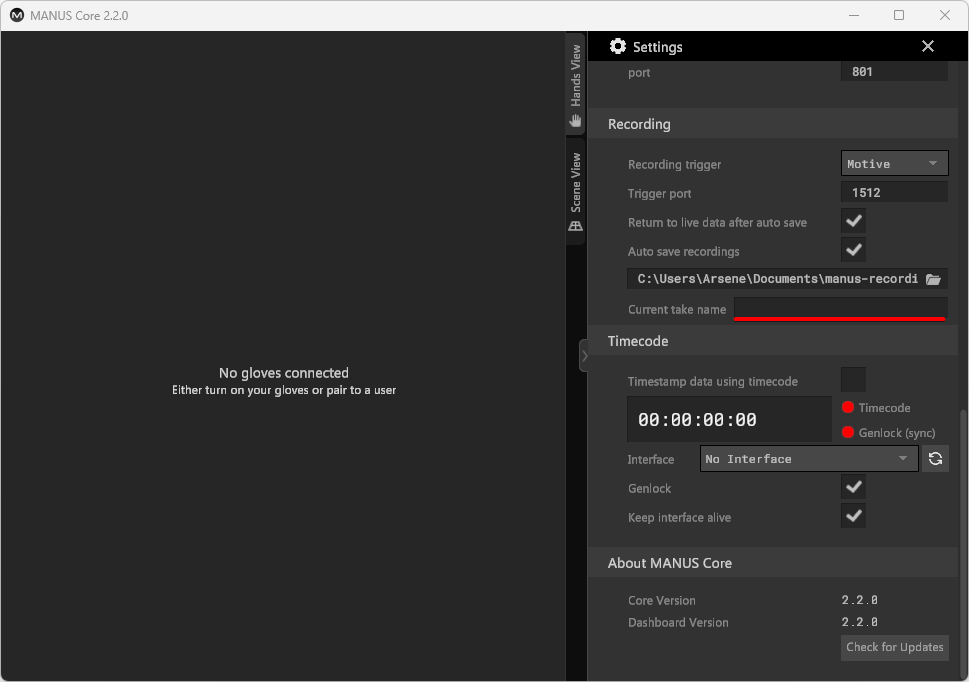
OptiTrack Motive 3
Open the MANUS Core Dashboard "Settings" tab:
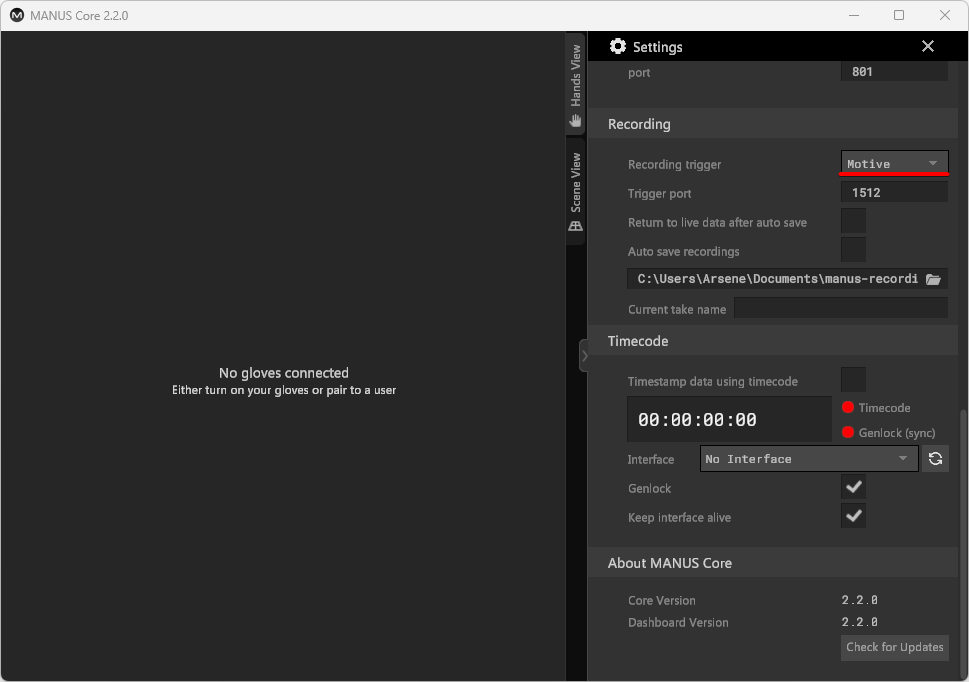
Scroll down to the "Recording" section:
Select "Motive" as recording trigger:
Set the trigger port (the default port is 1512):
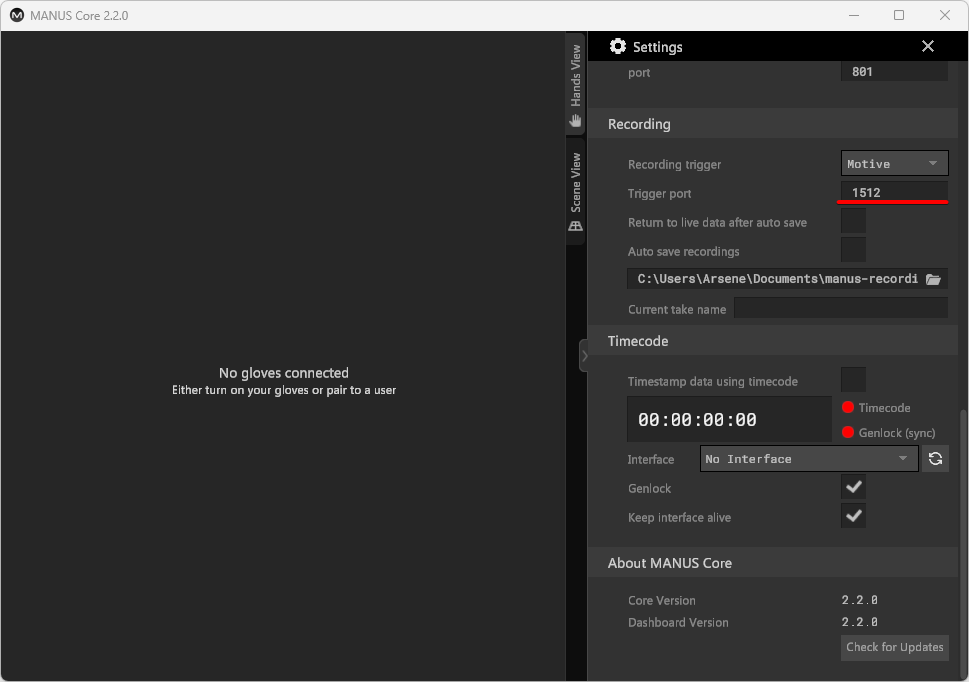
The trigger port will be the Command Port configured in Motive (default: 1510) incremented with 2 (1510+2 = 1512).
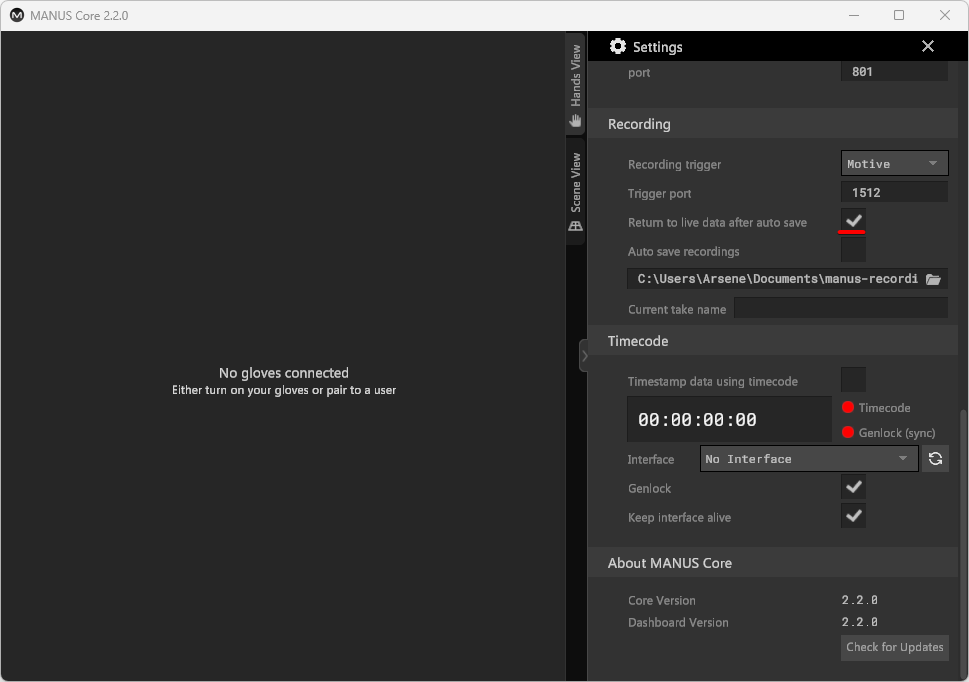
Enable "Return to live data after auto save" to unload the recording after saving:
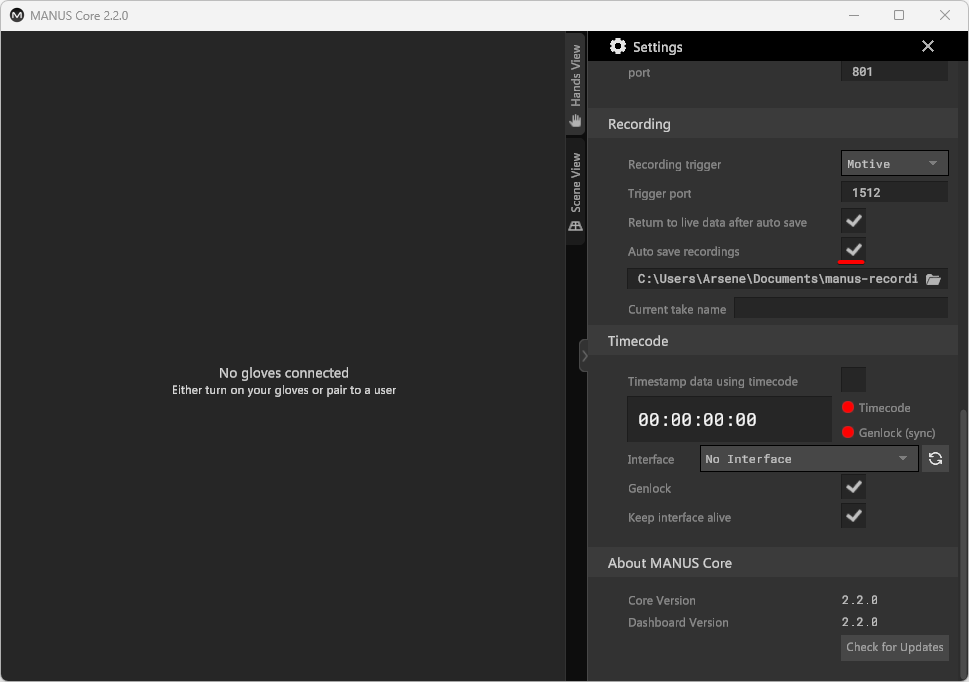
Enable "Auto save recordings" to automatically save your recordings:
The 'take name' will be provided by the UDP trigger message:
The absolute file path from Motive will be provided by the UDP trigger message:
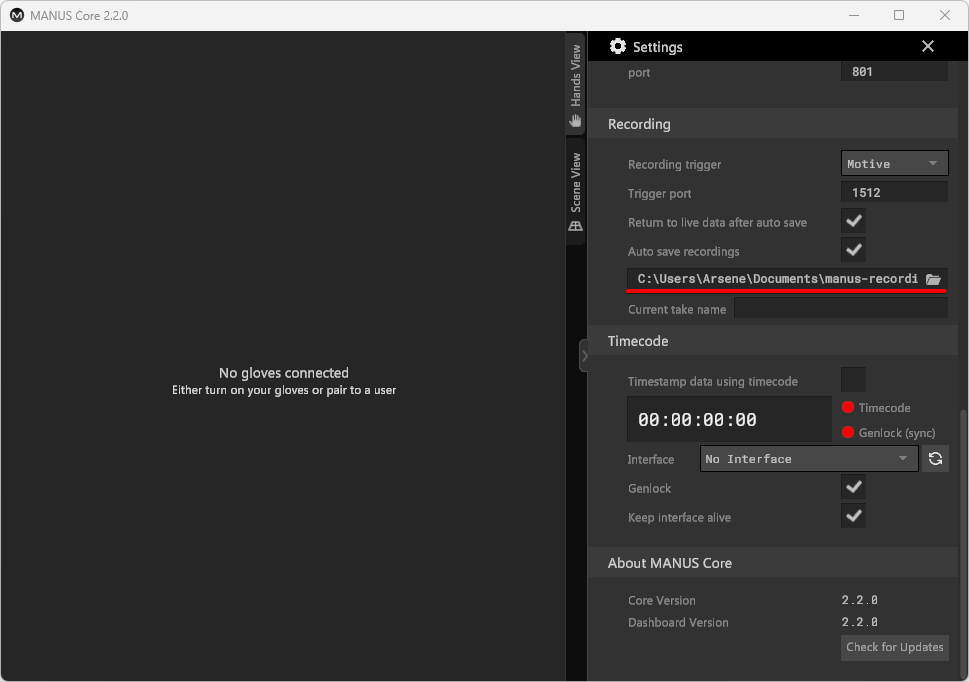
If the absolute file path on the computer running Motive is not accessible by the Bodypack, the file will be saved locally on the Bodypack using the default file save directory.
Consider using a network accessible folder to save all your recordings in one place.
MANUS Core can be configured to receive Timecode & Sync triggers, allowing you to timestamp and synchronize your data recording.
OptiTrack Motive 2
Open the MANUS Core Dashboard "Settings" tab:
Scroll down to the "Recording" section:
Select "Motive" as recording trigger:
Set the trigger port (the default port is 1512):
The trigger port will be the Command Port configured in Motive (default: 1510) incremented with 2 (1510+2 = 1512).
Enable "Return to live data after auto save" to unload the recording after saving:
Enable "Auto save recordings" to automatically save your recordings:
The 'take name' will be provided by the UDP trigger message:
The absolute file path from Motive will be provided by the UDP trigger message:
If the absolute file path on the computer running Motive is not accessible by the Bodypack, the file will be saved locally on the Bodypack using the default file save directory.
Consider using a network accessible folder to save all your recordings in one place.
MANUS Core can be configured to receive Timecode & Sync triggers, allowing you to timestamp and synchronize your data recording.
Manual Local Recording with Wi-Fi
MANUS Core Dashboard can connect over Wi-Fi to the Bodypack from another computer.
While recording the data is saved locally on the Bodypack. After recording, MANUS Core can wirelessly transfer the saved data to the remote computer running Dashboard.
Using this method, it's important to make sure both the Bodypack and the other computer remain connected to the Wi-Fi network.
Connecting to Bodypack
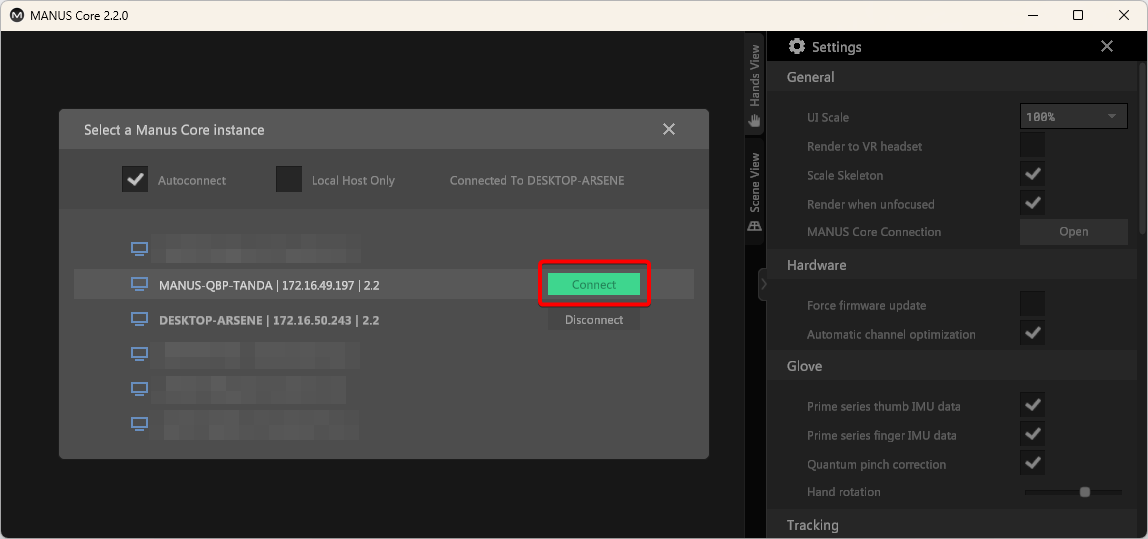
Open the MANUS Core Dashboard and go to settings:

Open the "MANUS Core Connection" menu:

Make sure "Local Host Only" is unchecked to see MANUS Core instances on your local network:

The Bodypack hostname starts with "MANUS-QBP-" and it followed by 5 random characters:

Click "Connect" to connect MANUS Core Dashboard to your Bodypack:
Recording
With MANUS Core Dashboard connected to your Bodypack, you can simply record using the Dashboard interface:
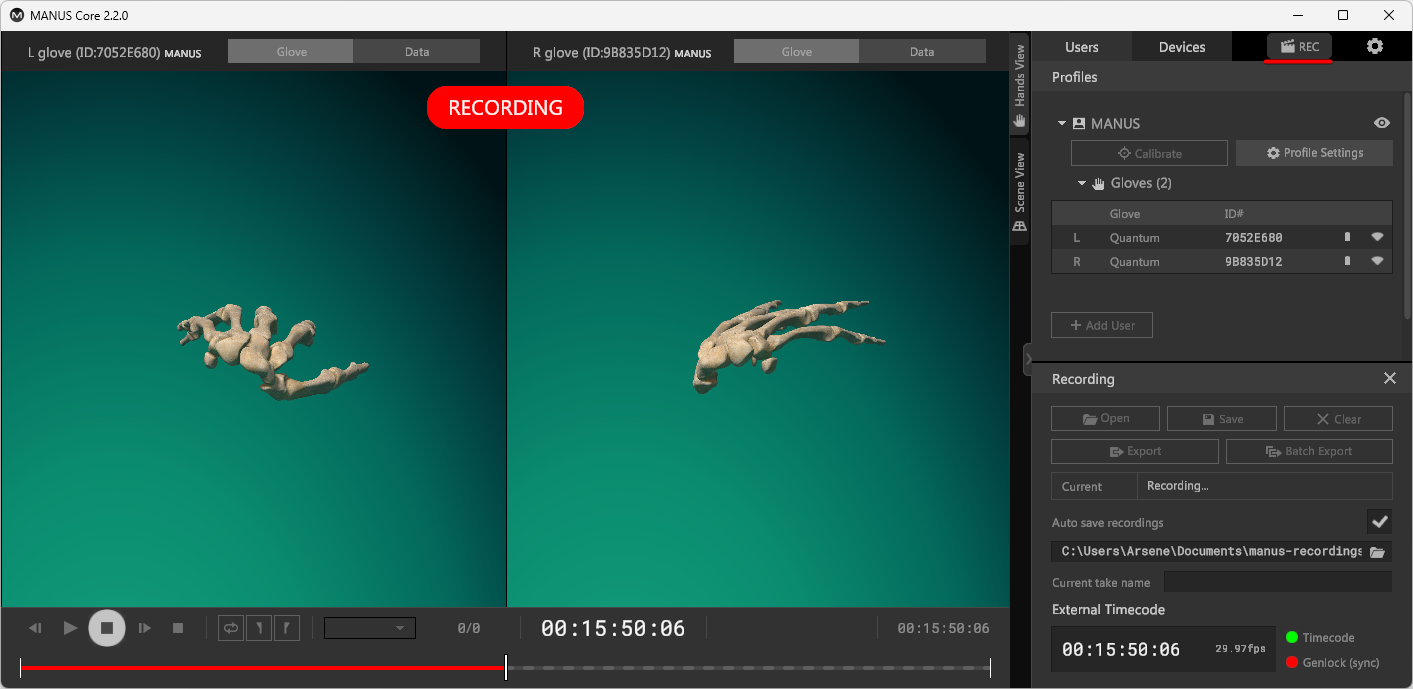
While recording the data is saved locally on the Bodypack.
MANUS Core can be configured to receive Timecode & Sync triggers, allowing you to timestamp and synchronize your data recording.
Saving
With MANUS Core Dashboard connected to your Bodypack, the recorded data will wirelessly transfer to the remote computer running Dashboard.
The recording will be saved in the "Auto save recordings" folder:
Manual Local Recording without Wi-Fi
MANUS Core Dashboard can directly run on the Bodypack. The recorded data is saved locally on the Bodypack and can be accessed through a shared network folder.
Only when manually starting and stopping recording you need access to the Bodypack, either remotely over Wi-Fi or locally by connecting it to a display, mouse and keyboard.
Connecting to Bodypack
The Bodypack can be controlled by physically connecting it to a display, mouse and keyboard, or remotely by connecting to it using 'remote desktop' software.
Follow the instructions on how to connect to your Bodypack.
Recording
You can record with the MANUS Core Dashboard directly on the Bodypack.
Use the Dashboard on the Bodypack to record:

MANUS Core can be configured to receive Timecode & Sync triggers, allowing you to timestamp and synchronize your data recording.
Saving
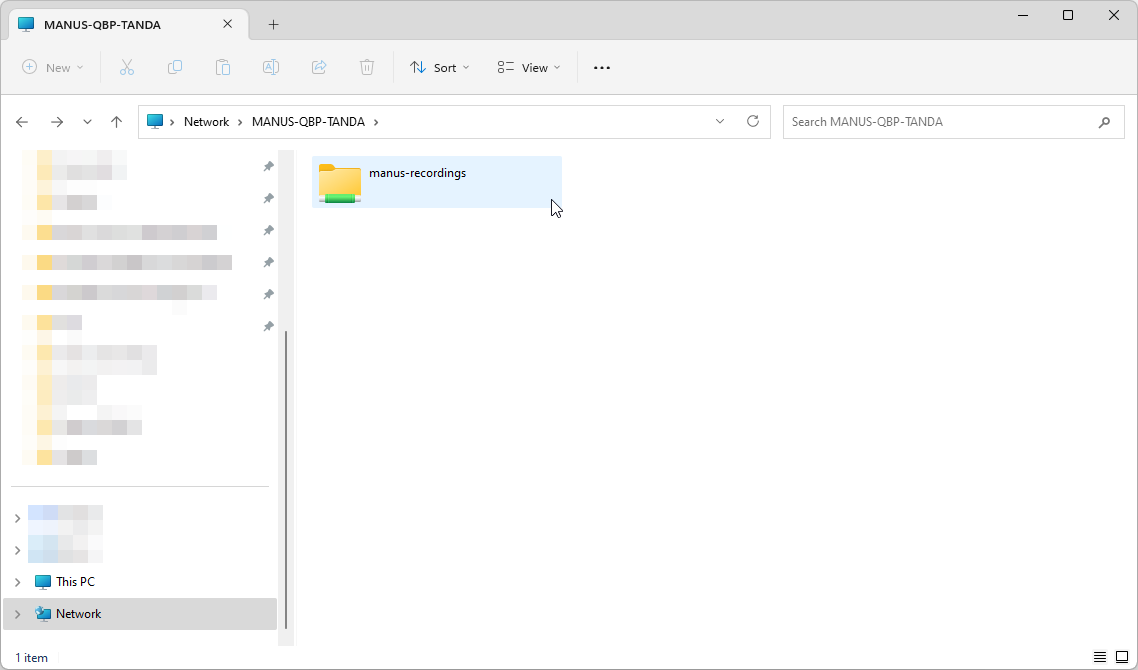
The recorded data is saved on the Bodypack and can be accessed in the file save location and through the network.
The default file save location for recordings is "C:\Users\Manus\Documents\manus-recordings\":
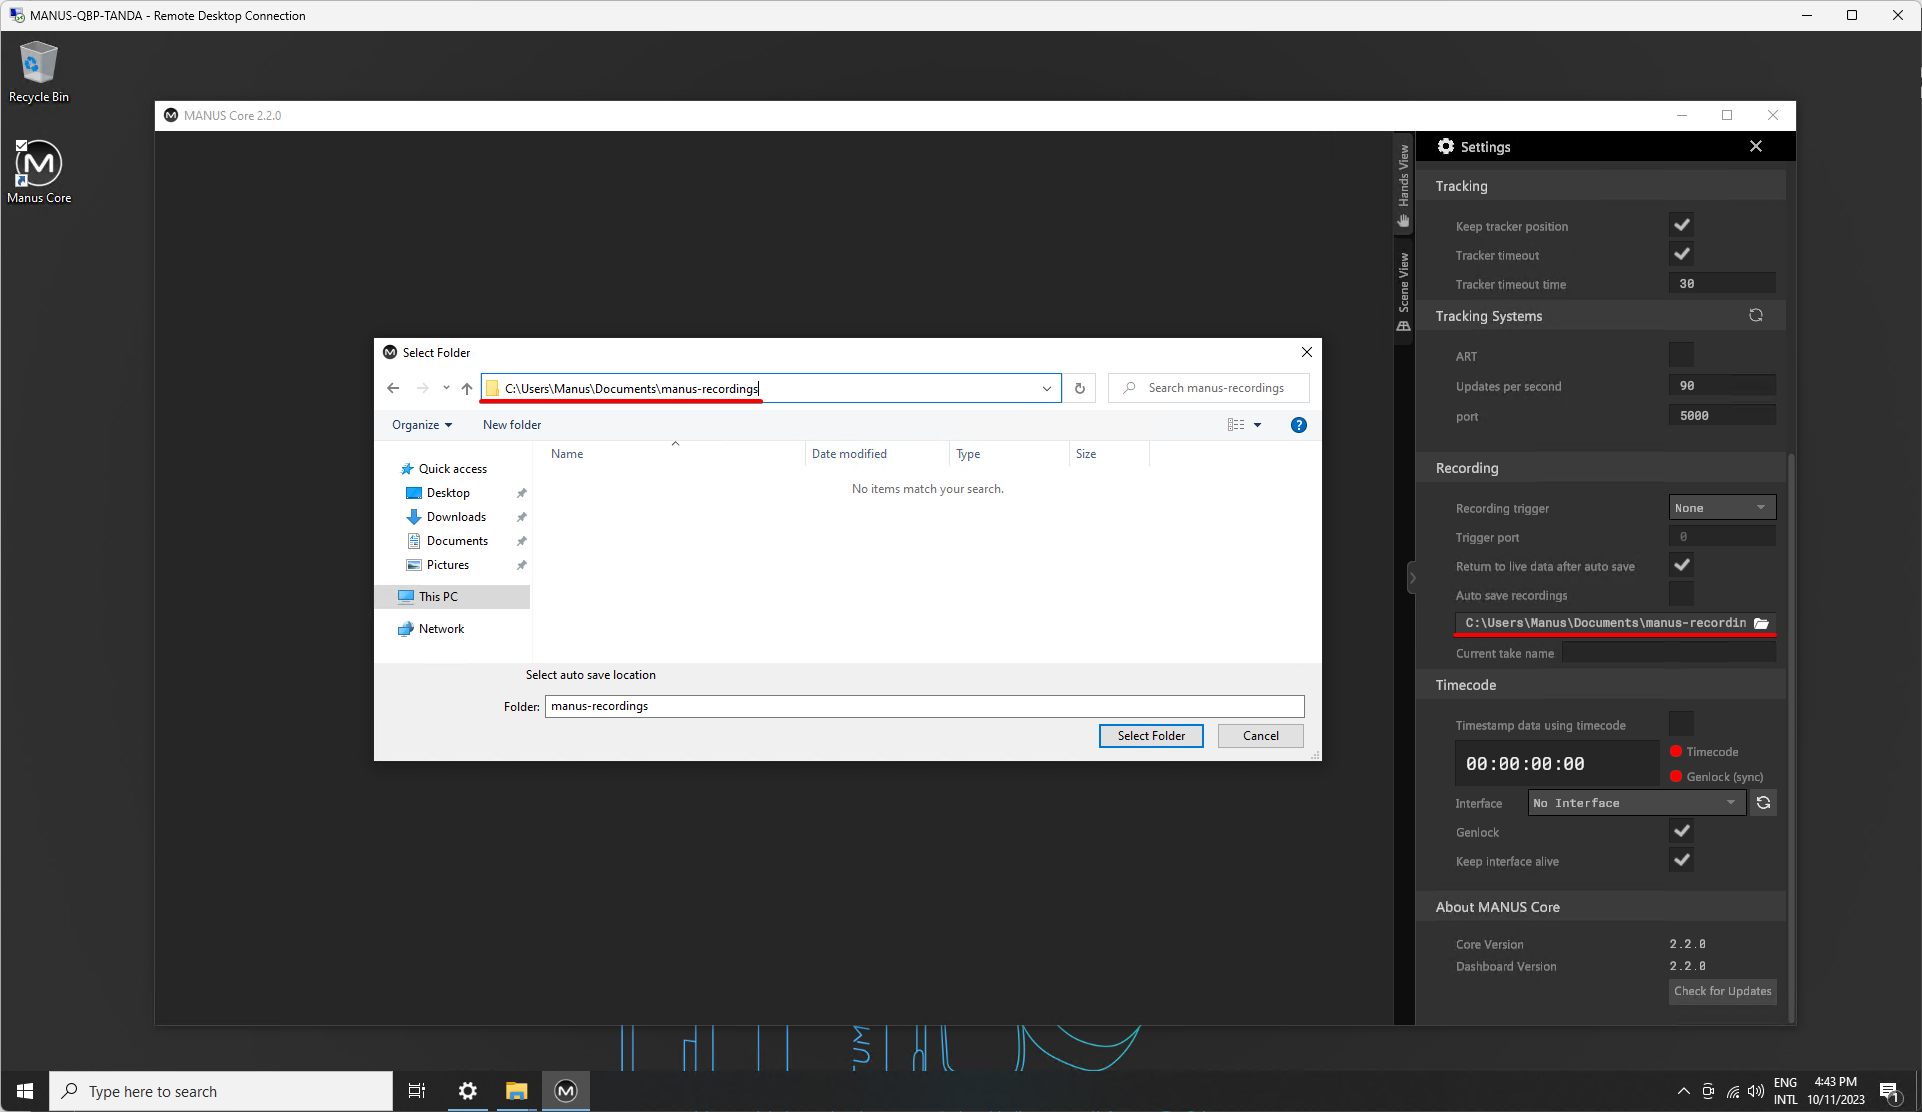
Recordings saved in the default file save location on the Bodypack can be accessed remotely from another computer:
Live Preview
Connecting to Bodypack
MANUS Core Dashboard can be used to live preview glove data.
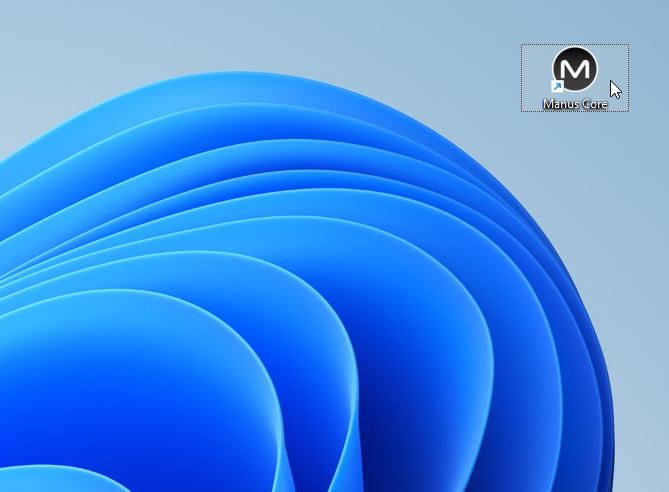
To launch MANUS Core Dashboard, use the "Manus Core" desktop icon:
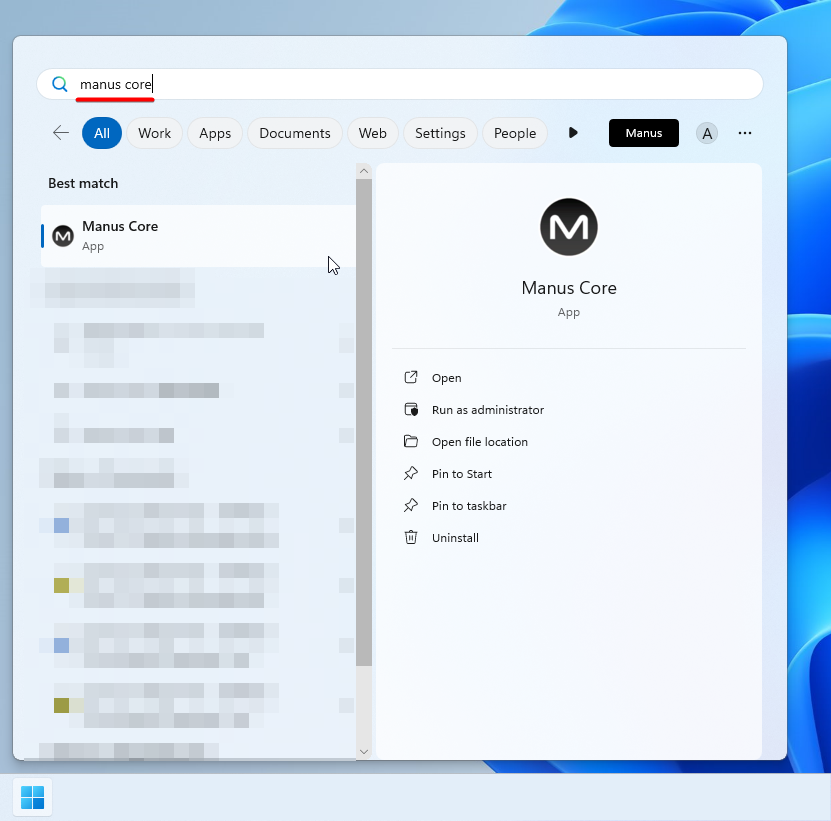
If you do not have a "Manus Core" desktop icon, launch the MANUS Core Dashboard from the Windows Start menu by searching for "manus core":
If you do not have the "Manus Core" start menu application, launch MANUS Core Dashboard from the installation folder:
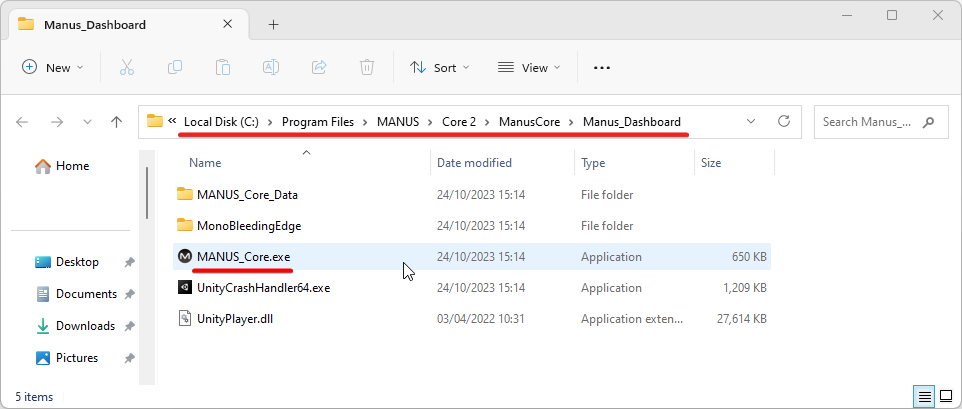
The default default installation folder is "C:\Program Files\MANUS\Core 2\ManusCore\Manus_Dashboard\".
Go to settings in the MANUS Core Dashboard:
Open the "MANUS Core Connection" menu:
Make sure "Local Host Only" is unchecked to see MANUS Core instances on your local network:
The Bodypack hostname starts with "MANUS-QBP-" and it followed by 5 random characters:
Click "Connect" to connect MANUS Core Dashboard to your Bodypack:
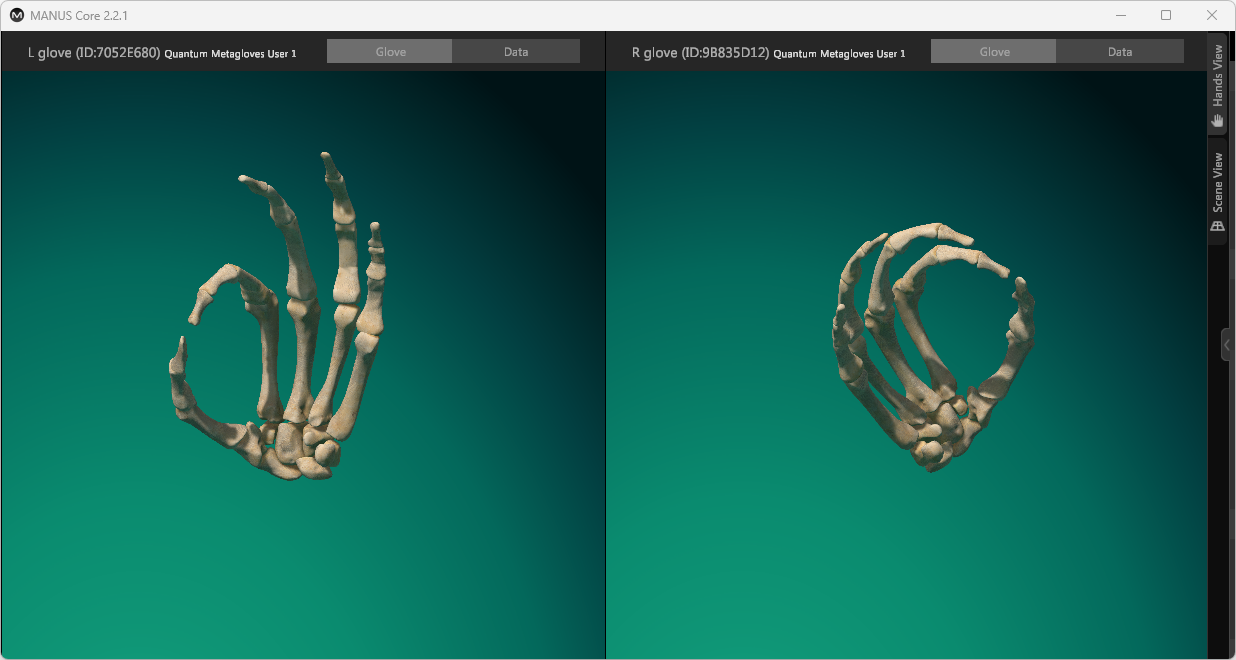
With Dashboard connected to the Bodypack, you can live preview the MANUS glove data:
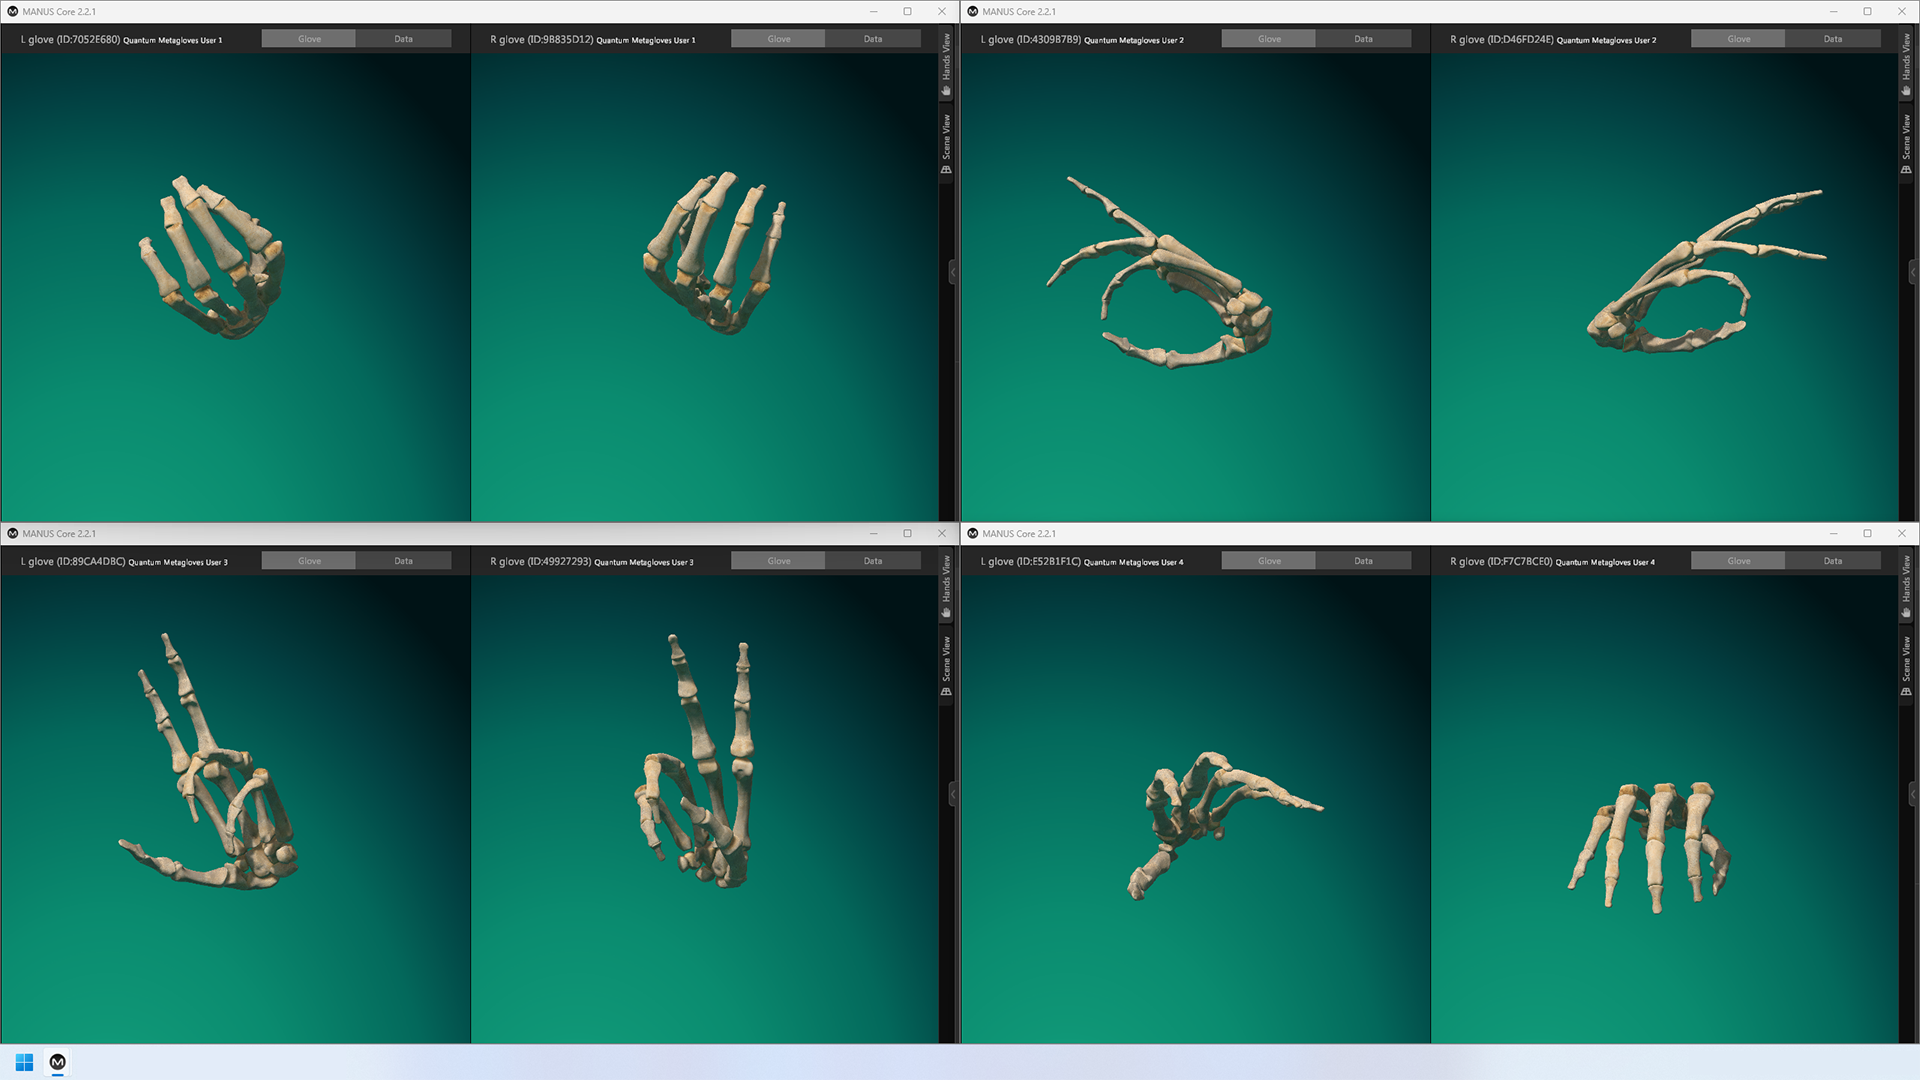
Connecting to Multiple Bodypacks
Multiple MANUS Core Dashboards can be used to live preview glove data from multiple Bodypacks.
Launch MANUS Core Dashboard multiple times, using the "Manus Core" desktop icon:
If you do not have a "Manus Core" desktop icon, launch the MANUS Core Dashboard from the Windows Start menu by searching for "manus core":
If you do not have the "Manus Core" start menu application, launch MANUS Core Dashboard from the installation folder:
The default default installation folder is "C:\Program Files\MANUS\Core 2\ManusCore\Manus_Dashboard\".
Go to settings in the MANUS Core Dashboard:
Open the "MANUS Core Connection" menu:
Make sure "Local Host Only" is unchecked to see MANUS Core instances on your local network:
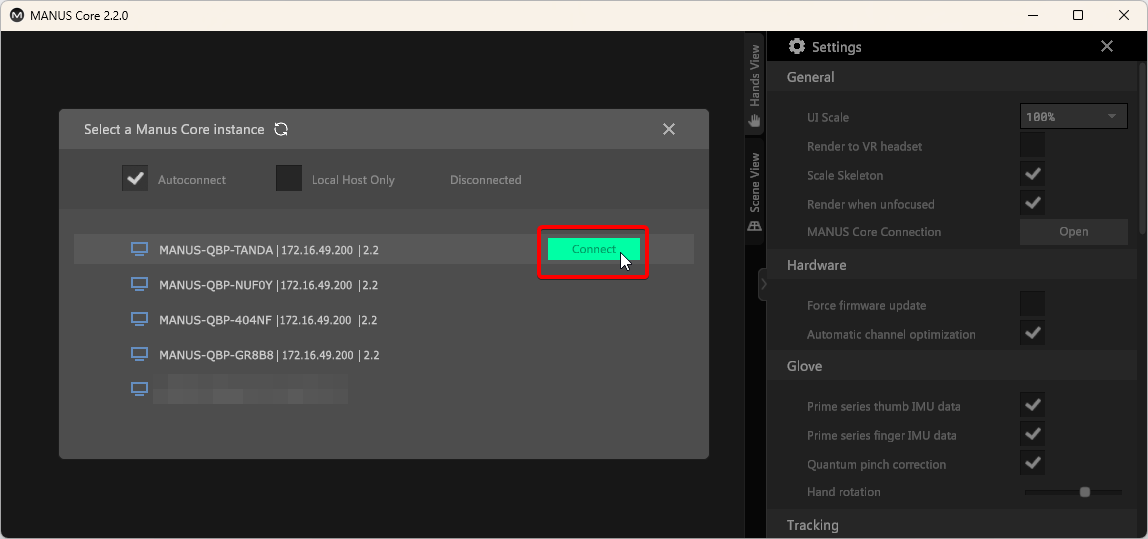
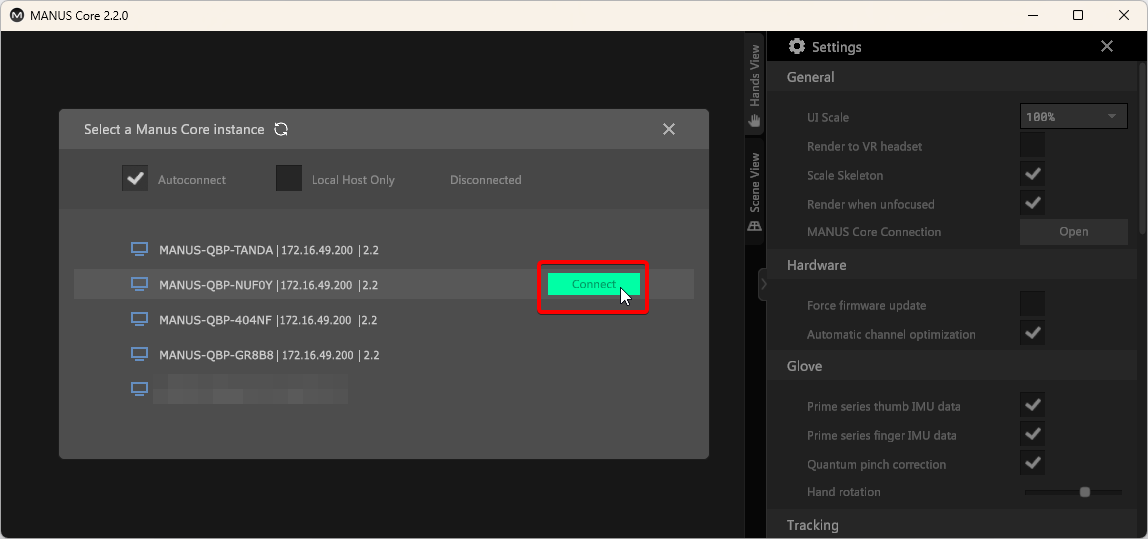
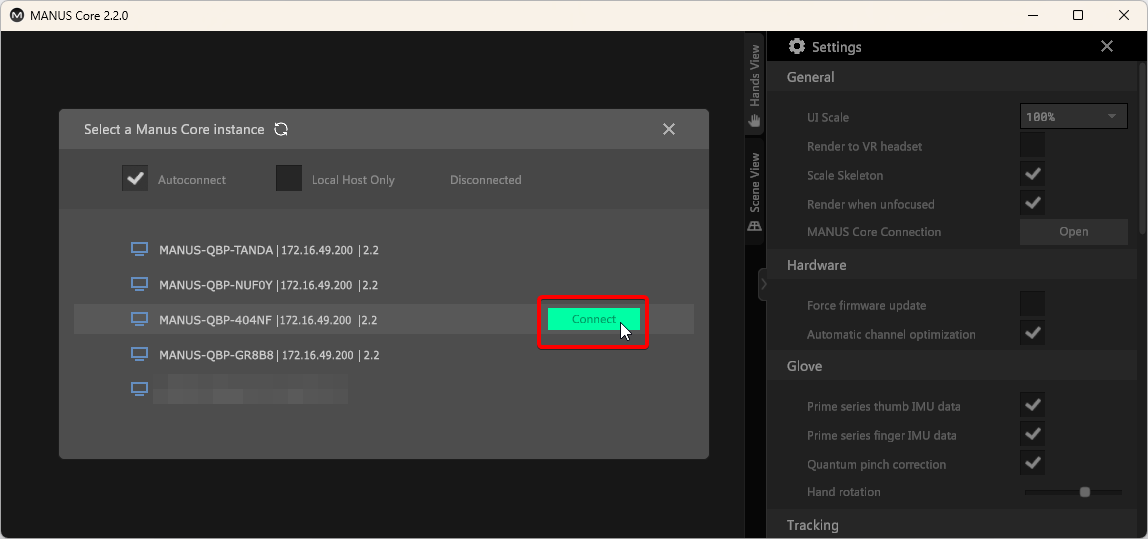
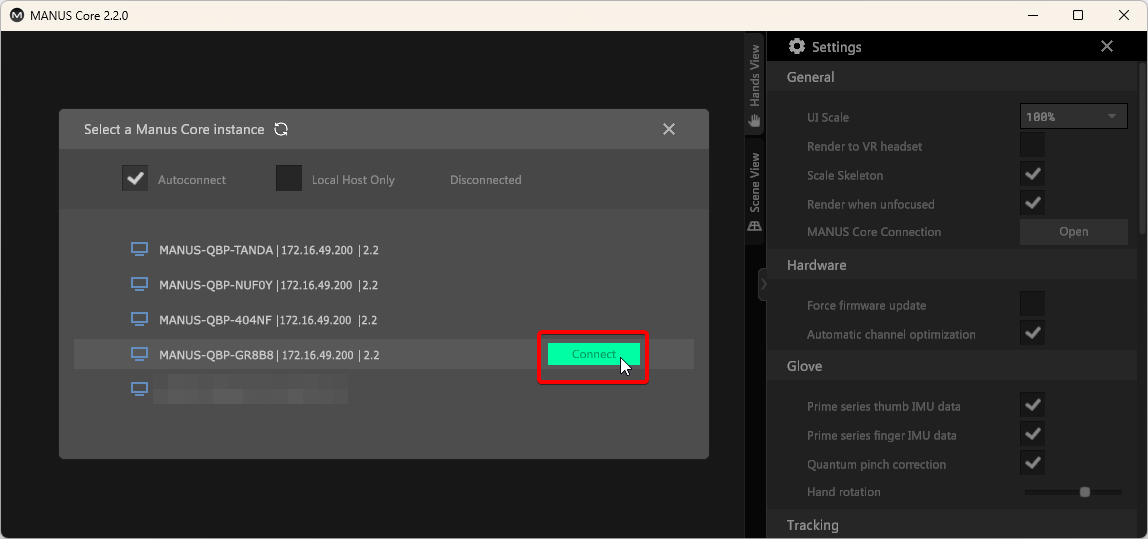
The Bodypack hostname starts with "MANUS-QBP-" and it followed by 5 random characters:
In this example, we have opened Dashboard 4 time
s to connect to 4 individual Bodypacks:
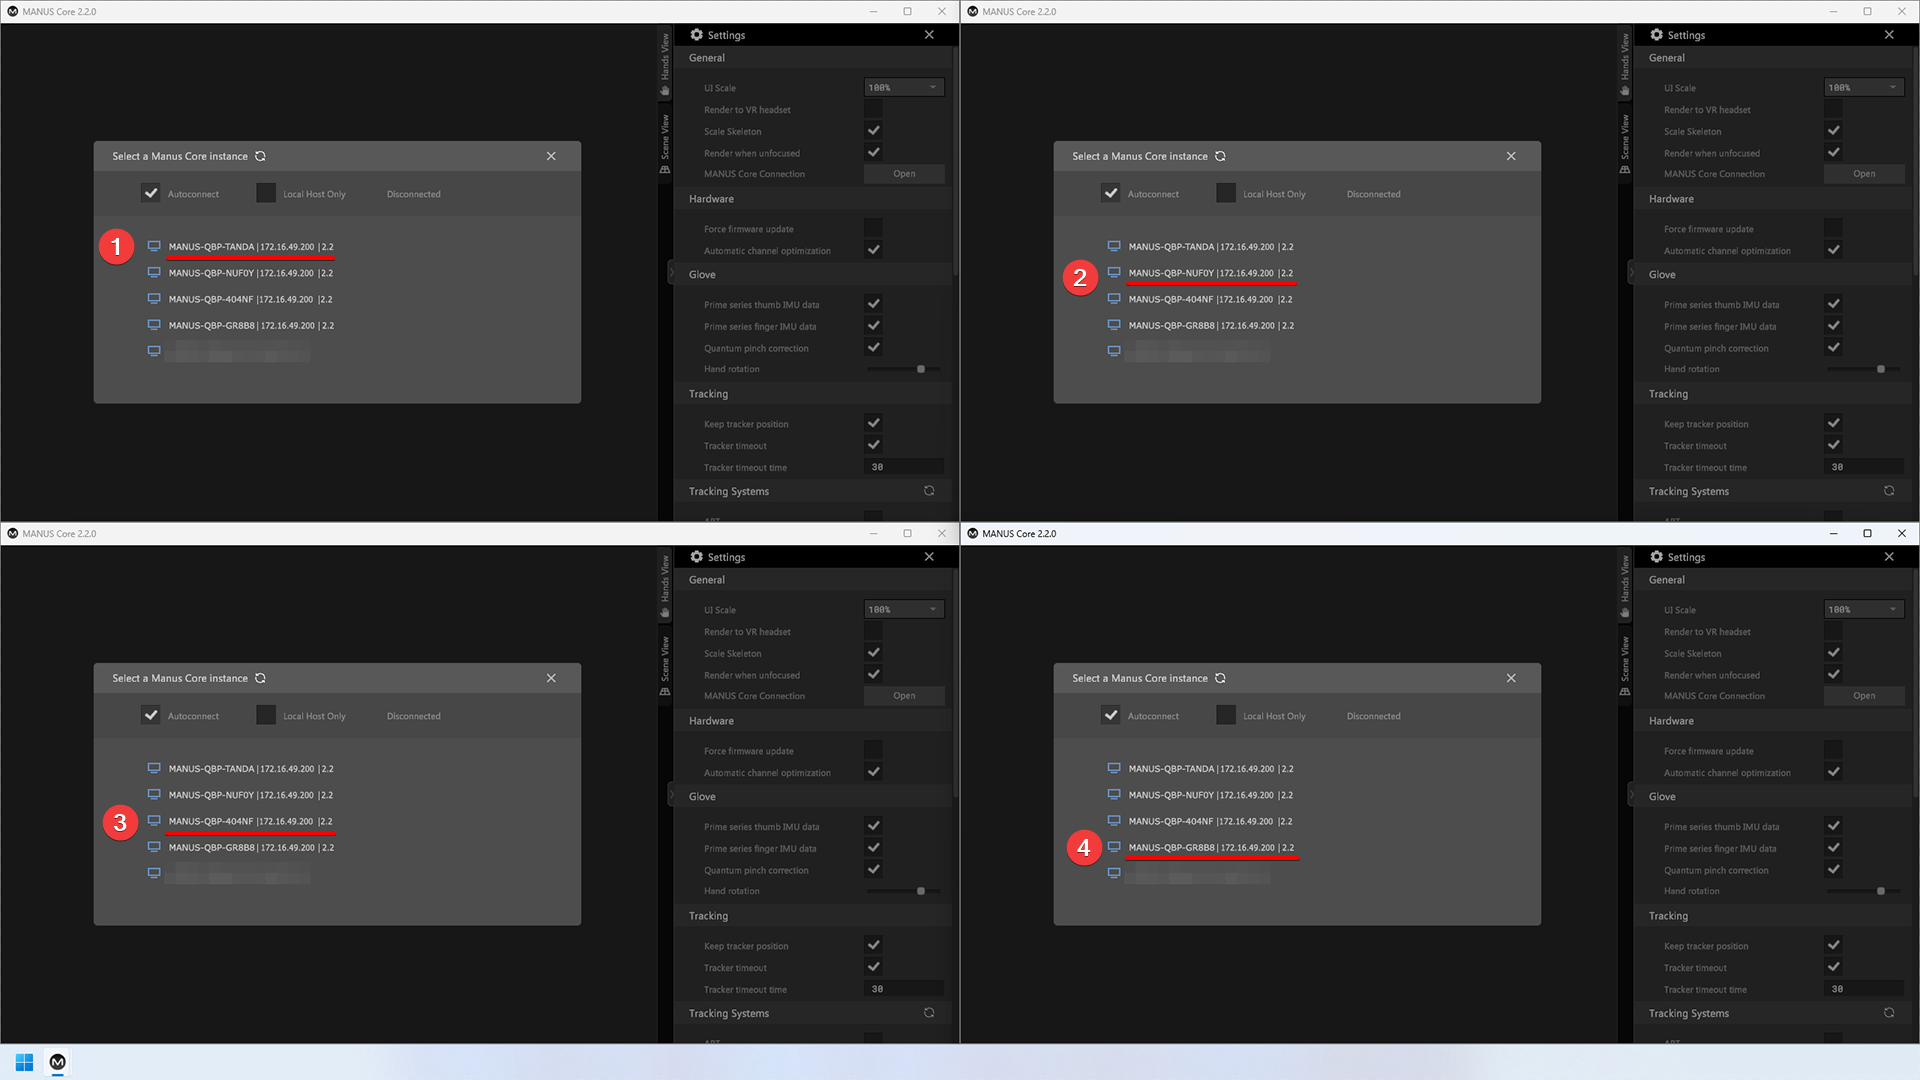
Click "Connect" to connect MANUS Core Dashboard to Bodypack 1:
Click "Connect" to connect MANUS Core Dashboard to Bodypack 2:
Click "Connect" to connect MANUS Core Dashboard to Bodypack 3:
Click "Connect" to connect MANUS Core Dashboard to Bodypack 4:
With all Dashboards connected, you can live preview glove data on all Bodypacks: